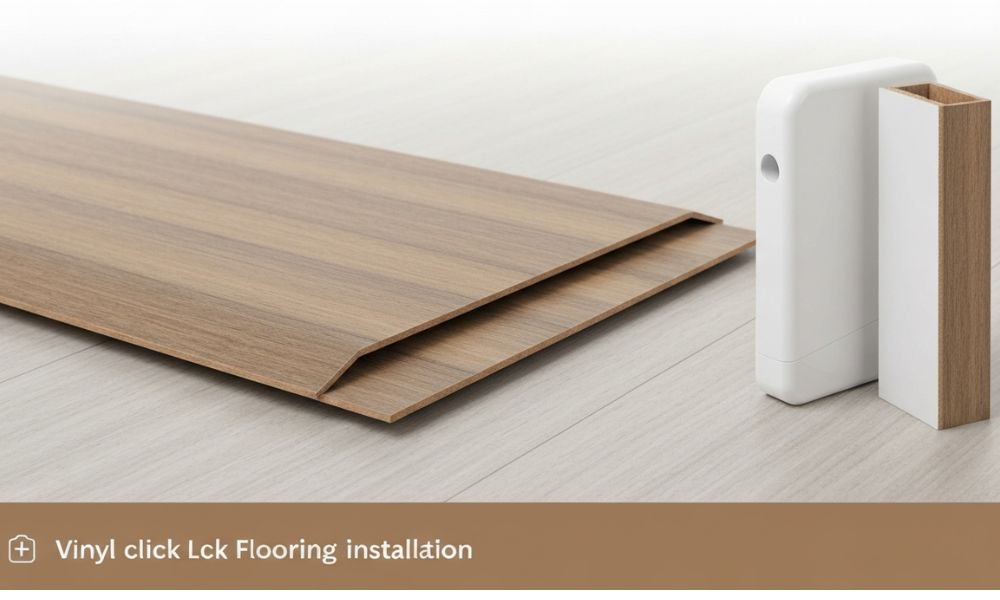
Vinyl click lock flooring installation has transformed home remodeling into an accessible and rewarding DIY project. This popular luxury vinyl option successfully combines the sophisticated aesthetic appeal of high-end materials like natural wood or stone with essential practical benefits, such as water resistance and enhanced durability. The flooring’s innovative core feature is its mechanical interlocking system, which allows the planks or tiles to snap together seamlessly without the need for messy glues, nails, or staples, establishing a secure “floating floor” system. Mastering this straightforward installation process is incredibly relevant today because it facilitates significant labor savings and provides a cost-effective path to achieving a professional, long-lasting finish in nearly any space, including high-moisture zones like kitchens and bathrooms.
Defining the Mechanics of Vinyl Click Lock Flooring Installation
Homeowners highly regard vinyl click lock flooring installation for its simplicity and efficiency compared to older methods. This durability and versatility is achieved through a precision-milled tongue-and-groove profile on all four sides of the plank, which mechanically locks the pieces securely together. This secure connection results in a seamless, flat, and stable floating floor surface. Installation is relatively quick, demanding minimal effort, and often requires only a utility knife for cutting the vinyl planks, rather than specialized power saws. The simple vinyl snap-Click-fit flooring installation method makes this flooring system incredibly accessible for DIY enthusiasts, allowing them to achieve professional results without previous extensive experience.
Understanding Material Types for Stable Vinyl Click Lock Flooring
When selecting flooring for vinyl snap-click-fit flooring installation, the core material choice is crucial, as it fundamentally dictates the floor’s performance characteristics. Traditional Luxury Vinyl Tile (LVT) features a flexible PVC core, which gives a softer feel underfoot but can be more susceptible to showing subfloor irregularities. Wood Plastic Composite (WPC) planks are generally thicker, incorporating wood flour, which results in superior cushioning, sound insulation, and improved warmth. Stone Plastic Composite (SPC), often recommended for its rigidity, uses an extremely dense core composed of limestone powder and stabilizers. This dense, rigid composition ensures that SPC click luxury vinyl plank is highly resistant to temperature fluctuations and dents, providing an exceptionally stable outcome for your vinyl snap-lock floor fitting project.
Assessing Durability: Specifications Crucial for Vinyl Click Lock Flooring
Two key measurements—plank thickness and wear layer thickness—directly determine the longevity and value of your vinyl click lock flooring. The overall plank thickness, typically measured in millimeters (mm), generally ranges from 4mm to 8mm, with thicker options usually offering greater stability and underfoot comfort. More critical for protecting the floor’s aesthetic is the wear layer. Measure this transparent protective shield in mils (one thousandth of an inch) to protect the plank from daily wear, scuffs, and scratches. While a 12-mil layer (approx. 0.3mm) is adequate for standard home use, high-traffic areas or light commercial settings require a wear layer of 20 mils or more to ensure prolonged durability following the vinyl snap-lock floor fitting.
Essential Pre-Installation Steps for Successful Vinyl Click Lock Flooring Installation
Proper and thorough preparation is the mandatory first stage for a long-lasting vinyl easy-lock floor installation. Start by removing existing base moldings and undercutting all door jambs to accommodate the new flooring thickness. Ensure the room is cleared of all furniture. A vital rule is that fixed objects, such as heavy cabinets or kitchen islands, must not be installed on top of the floating floor. Instead, the planks must be cut to abut these structures, leaving the mandatory expansion space. Carefully measure the installation area, calculating the required quantity and purchasing an additional 10% to account for cutting waste. Finally, inspect every plank for visible defects before and during installation, and avoid installing any damaged planks.
Subfloor Flatness Requirements for Vinyl Click Lock Flooring
The integrity of a smooth and stable vinyl snap-lock flooring installation is directly dependent on the condition of the subfloor, which acts as the crucial supporting structure. The subfloor must be dry, clean, level, smooth, and entirely free from contaminants like dust, glues, or chemicals. Ensure the subfloor meets specific flatness tolerances: for Click Lock SPC flooring, keep it flat within 3/16 inch over a 10-foot span or 1/8 inch over a 6-foot span. Correct any significant unevenness by filling low spots with cementitious leveling compounds or grinding down high areas. When installing over existing tile, patch the grout lines smoothly with a latex-fortified compound to create an even surface. A latex fortified compound to create an even surface, preventing plank compression after installation.
Acclimating and Controlling Temperature for Vinyl Click Lock Flooring
Strict temperature management is vital during vinyl snap-lock floor fitting to avoid future contraction or expansion, which can lead to visual defects and void the warranty. Standard vinyl planks typically require a minimum 48-hour acclimation period in the installation environment, with boxes opened and temperatures consistently maintained between 65°F and 85°F. However, you usually do not need to acclimate rigid core products like Click Lock SPC unless you stored them in extreme temperatures (below 50°F or above 100°F) within the 12 hours before installation. If necessary, place SPC cartons in the service temperature (60°F to 85°F) for at least eight hours while keeping the packages unopened. Maintaining this consistent temperature throughout the vinyl snap-Click-fit flooringg floor fitting process is essential for long-term product stability.
Essential Tools and Layout Planning for Vinyl snap-lock flooring
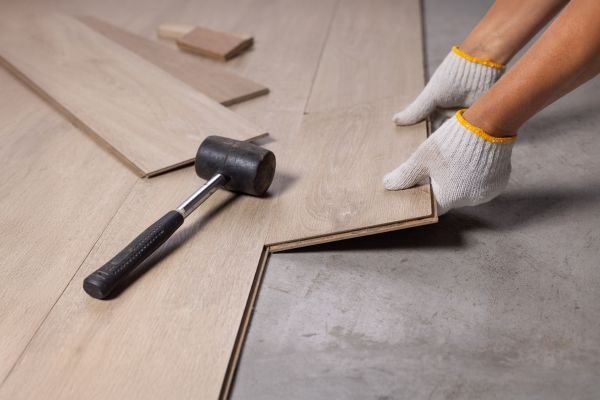
Having the correct tools readily available streamlines the vinyl click lock flooring installation project dramatically. Necessary items include basic tools such as a utility knife, tape measure, T-Square, chalk line, hammer, tapping block (or rubber mallet), 1/4 inch spacers, and safety glasses. When planning the layout, determine the optimal direction for the planks. Lay planks parallel to the longest room dimension or to the main light sources, such as windows or doors, to visually enhance the space. Calculate the projected width of the final row; if it measures less than half the plank width, you must adjust the starting row accordingly to ensure a balanced aesthetic.
Executing the First Rows of Vinyl Click Lock Flooring Installation
The physical vinyl snap-Click-fit flooring installation typically commences from the left side of the starting wall and proceeds rightward, ensuring the tongue side of the plank faces the wall. If you begin with a full-width plank, the tongue facing the starting wall must be removed. Assemble the end joints by inserting the tongue into the groove of the previous plank at a low 20-30° angle, then gently lowering the plank flat with downward and inward pressure until the joint closes securely. Use planks mixed from four or five cartons to ensure a pleasing, randomized pattern. Use the cut piece from the first row to start the second row, as long as it is at least 8 inches long, to ensure efficient material use.
Maintaining Required Expansion Gaps in snap-lock flooring
Maintaining a sufficient expansion space is a fundamental, non-negotiable step for a successful vinyl click lock flooring installation. Maintain a minimum 1/4 inch (6mm) expansion gap around the entire room perimeter and along all fixed vertical objects, including walls, pipes, and columns. Use spacers consistently along the walls to guarantee this necessary separation. This deliberate gap permits the floating floor to expand and contract naturally in response to ambient temperature and humidity shifts, effectively preventing the entire floor from buckling. For installations in very large areas—exceeding 65 lineal feet or 4200 sq. ft.—it is prudent to increase the perimeter expansion gap to 1/2 inch (12mm) to ensure long-term stability.
Staggering Joints and Locking Subsequent Rows of Vinyl Click Lock Flooring
After the first row is set, the structural integrity and visual appeal of the vinyl click lock flooring installation depend on proper staggering. End joints must be offset from row to row by a minimum of 8 inches (20.3cm) to create a strong, randomized appearance. To install the second row, insert the long side tongue into the groove of the previous row at a low angle. To connect the short end joint, angle the end tongue into the previous plank, ensuring the long side tongue slightly overlaps the previous row’s groove before applying gentle downward pressure to lock the plank fully into place. It is extremely important that the first two rows are perfectly straight and square, as any initial alignment issue will adversely affect the entire rest of the vinyl snap-lock floor fitting.
How to Work Around Doorways, Pipes, and Wet Areas
Use specific techniques when installing vinyl snap-lock flooring around architectural obstacles. When fitting planks around door trim, it is best practice to undercut the door jambs to allow the plank to slide neatly underneath, leaving only a minimal 1/64 inch gap above the finished surface. When addressing pipes, drill the necessary holes 1/2 inch (12mm) larger than the pipe diameter to ensure the required expansion space. In bathrooms, the floor can be laid under a toilet only if the room is separated by a doorway threshold. Otherwise, cut and install the planks around the toilet, leaving a 1/8 inch expansion gap, and seal all wet perimeter gaps with high-quality 100% silicone caulking to prevent water seepage.
Finishing Touches and Securing Moldings After Installation

Upon completing the main vinyl click lock flooring installation, the final steps involve securing the perimeter and ensuring a clean finish. First, remove all temporary perimeter spacers. Next, install the transition moldings and baseboard trim, making sure the trim fully covers the required 1/4-inch expansion gap. A critical point: you must not fasten any moldings through the flooring planks or directly into the subfloor. Pre-drill all moldings and secure them only to the wall. This method maintains the integrity of the floating floor system, allowing the luxury vinyl plank to expand and contract freely as needed. For guidance on installing waterproof options, see our waterproof click lock flooring for bathroom guide. If any edges remain exposed, such as around pipes, fill the gap using a high-quality silicone caulking.
Maximizing Longevity: Maintenance for Vinyl Click Lock Flooring
Maintaining the attractive finish of your vinyl snap-lock flooring is simple, thanks to its durable urethane top layer which requires no wax or special finishes. Routine maintenance involves daily sweeping or vacuuming using soft bristle attachments to remove abrasive dirt and debris that can prematurely wear down the surface. For deeper cleaning, use a damp mop and a neutral pH floor cleaner, and avoid harsh chemicals like ammonia, chlorine bleach, or heavy abrasives, as they can damage the wear layer or leave dull residues. Use non-staining mats at all entryways to capture dirt. Furthermore, always install oversized (minimum 2” diameter) hard plastic or nylon floor protectors under all furniture legs, replacing them every six months, to prevent concentrated pressure damage.
Cost-Effectiveness of DIY Vinyl Click Lock Flooring Installation
Homeowners choose a DIY vinyl floating floor installation mainly to save money by avoiding professional labor costs. While the material cost for click luxury vinyl plank typically ranges between $2 and $5 per square foot, professional installation services can add an extra expense of $1.50 to $3 per square foot. The click-and-lock mechanism allows homeowners to install the flooring themselves using only basic tools, completely avoiding hefty labor fees. This ease of installation offers a remarkably high-value return on investment, making vinyl snap-Click-fit flooring floor fitting an accessible, affordable choice for refreshing any space quickly and efficiently.
Conclusion
Vinyl click lock flooring installation delivers a superior combination of elegant design, waterproof durability, and unmatched installation simplicity, solidifying its place as a top choice for modern homeowners. Successful installation is predicated on thorough preparation, particularly ensuring the subfloor is flat, adhering to temperature guidelines, and rigorously maintaining the 1/4 inch expansion gaps. The easy-to-use click-and-lock system ensures a stable, moisture-resistant, and high-traffic-ready floor. Follow this detailed, step-by-step guide to confidently complete your project, achieve a durable, professional-quality finish, and maximize your savings with DIY vinyl snap-click-fit flooring installation.

