Understanding how to install vinyl floor tiles with adhesive is the ultimate key to achieving a lasting, beautiful, and budget-friendly floor renovation in your home. Vinyl floor tiles offer exceptional versatility and provide an excellent, hard-wearing finish suitable for almost any room. These tiles are significantly lighter and easier for DIY enthusiasts to manage than large sheets of vinyl, minimizing waste if an error occurs. Modern vinyl options, which include both self-adhesive (“peel and stick”) types and those requiring separate liquid adhesive. Reduce the need for expensive professional labor and complex tools. This comprehensive guide provides the precise preparation. Layout and application techniques required, transforming the question of how to install vinyl floor tiles with adhesive into a successful weekend reality.
Tools and Prep: Laying the Foundation for Successful Installation
Before tackling how to install vinyl floor tiles with adhesive. Collecting the necessary basic tools ensures the project runs smoothly and efficiently. Essential equipment includes a sharp utility knife, ideally with a fresh blade for precise cutting. Along with a straight edge or steel ruler, and a pencil for marking. You will also need a ruler and possibly a spirit level to check the floor’s flatness. For surface cleaning, a gentle cleaning agent, such as sugar soap or dishwashing liquid, a bucket of warm water, and a cleaning cloth are required. If you select non-adhesive tiles, ensure you purchase the adhesive recommended by the manufacturer and the correct notched spreader for even application. Preparing all these items beforehand significantly streamlines the process of how to install vinyl floor tiles with adhesive.
Essential Subfloor Mastery: Learning How to Install Vinyl Floor Tiles with Adhesive
Proper subfloor preparation is the single most critical step when learning how to install vinyl floor tiles with adhesive, as optimal adhesion depends on a perfect surface. The existing floor must be sound, completely dry, and perfectly level before any material is laid. If the subfloor is concrete or screed. It must be meticulously cleaned: sweep, vacuum, and then wash it with warm soapy water to ensure it is clean and grease-free. After washing, allow the area to dry fully, then give it a quick brush or vacuum again to remove any lingering debris. If installing over old tiles, verify they are firmly stuck down; otherwise, they must be removed before proceeding. You must also ensure that no nail heads are sticking out from the subfloor.
Preparing and Sealing Porous Surfaces for Optimal Adhesion
Specific preparation is required when determining how to install vinyl floor tiles with adhesive over different types of subfloors, such as timber. If your subfloor is timber, firmly screw down any loose floorboards to eliminate movement. Following this, you should lay hardboard or plywood over the timber, fixing it with 25mm ring-shanked nails. Ensuring the smooth side faces upward. Tiles should generally not be laid directly onto floorboards, as the lines might eventually show through the vinyl. Porous surfaces, including cement, plywood, hardboard or chipboard. Must be sealed with a suitable primer before applying tile adhesive to ensure a strong bond. For new hardboard or plywood, sealing can be done using a watered-down PVA mix, typically a 2:1 ratio, applied with a roller and left to dry completely. Timber treated with wood preservative does not make a suitable sub-floor, even if you overlay it.
Measuring Tiles and Acclimation: Key Initial Steps
Accurate material calculation and proper acclimation prevent expensive delays and aesthetic issues during your how to install vinyl floor tiles with adhesive project. Measure the room’s area precisely, remembering to include any alcoves or bays in the total calculation. We strongly recommend purchasing an extra 10% of material to cover waste from cutting and potential future repairs. When buying, buy all packs simultaneously and verify that the item and batch numbers are consistent across every pack, as minor color differences can occur between production batches. Once the tiles are at home. Place them flat in the installation room and let them acclimate to the room’s temperature and humidity for at least 24 hours, and ideally 48 hours. This step is vital because it prevents post-installation expansion or contraction problems.
Strategizing Layout: Finding the Center for Symmetrical Installation
A professional-looking result depends on strategically planning how to install vinyl floor tiles with adhesive. Meaning you should never start laying along a wall. Most walls are not perfectly straight, and starting there often results in noticeable, unsightly narrow cuts at the skirting board. Instead, the most effective method is to locate the exact center point of the room and work outward in all directions. This strategy guarantees a symmetrical design. You can find the center by marking the mid-point of two opposite walls. Snapping a chalk line between them, and then using string and a pencil to draw intersecting arcs that create a perfect right-angle line through the room’s center. In awkwardly shaped rooms, center your layout lines on a strong focal point, such as a fireplace or patio doors.
Optimizing the Starting Line with the Dry-Laying Technique
After locating the room’s center, the dry-laying technique is essential for refining the starting point before you officially begin how to install vinyl floor tiles with adhesive. Dry-lay a row of tiles from the central line out toward one wall. Checking the gap left at the skirting board. The primary goal is to avoid an overly narrow strip of tile at the edge, as these thin strips look poor and may not adhere well. If the remaining gap is too small, the starting line must be moved back the width of half a tile. Repeat this dry-laying check toward the other walls, adjusting the start line until you have an even gap of approximately half a tile around the entire room. Once the ideal start point is found, drawing around the central tile with a pencil clearly marks the precise location to begin laying the adhesive.
Applying Adhesive: Mastering Self-Adhesive vs. Liquid Glue

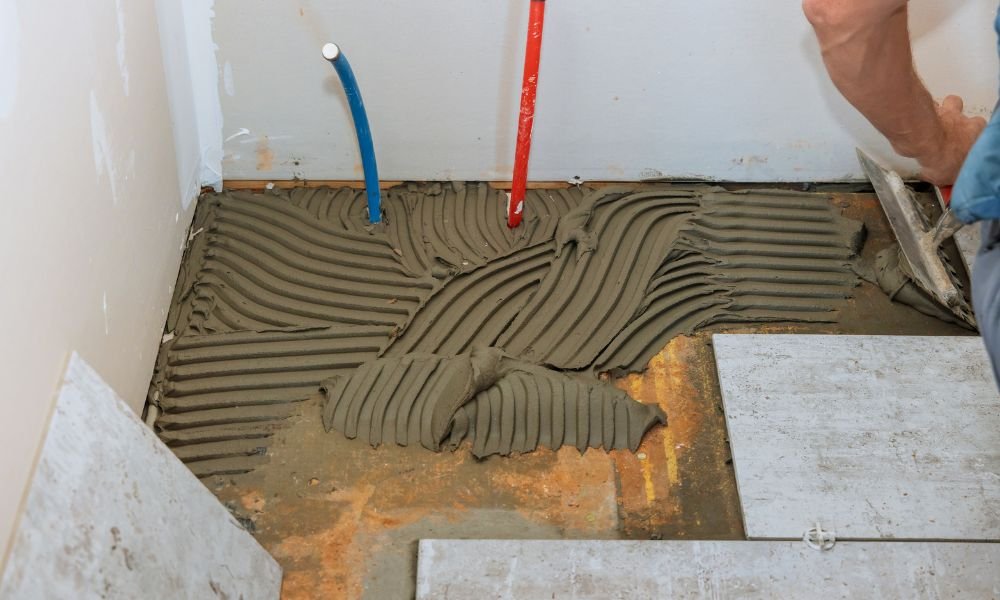
The application technique for how to install vinyl floor tiles with adhesive differs based on the product type: self-adhesive or separate glue-down tiles. For self-adhesive (peel and stick) tiles, peel off the backing paper. Line the edge up precisely against your pencil start lines, and firmly press the tile down onto the subfloor. You should then tread across the whole tile to maximize adhesion. If using non-adhesive tiles, you must first apply the manufacturer’s recommended liquid adhesive, typically using a notched spreader. Only spread enough adhesive to cover an area that you can lay tiles on within about 15 minutes. Which is usually around one square meter, before the glue begins to set. Press the non-adhesive tiles carefully into the wet glue. Ensuring every part of the tile is in full contact with the subfloor.
Precision Cutting Techniques: How to Install Vinyl Floor Tiles with Adhesive at Edges
Accurate cutting of perimeter tiles is necessary to achieve a clean. Professional finish when learning how to install vinyl floor tiles with adhesive. For straight cuts required along the skirting board, use the proven three-tile method. Place the tile you need to cut (Tile 1) exactly on top of the last full, adhered tile. Next, place a third full tile (Tile 2) on top, with its edge positioned against the wall. Use a chinagraph pencil or utility knife to mark the face of Tile 1 along the edge of Tile 2. Score along this line on a scrap board with a sharp utility knife, and then break the tile by bending it until it snaps along the scored line. Always dry-check the fit of the cut tile before removing the backing paper or applying adhesive and sticking it firmly in place.
Templating Awkward Shapes: Fitting Tiles Around Fixtures how to install vinyl floor tiles with adhesive
Learning how to install vinyl floor tiles with adhesive around complex obstacles like basin pedestals. Corners and door frames requires the creation of accurate templates. Use thin card or paper, perhaps cut from the tile packaging, sized to a single tile. Position this card template against the fixture and cut small slits on the side where the obstacle rests. Press the flaps of the template against the obstacle with a blunt knife and draw a pencil line where the fixture meets the floor. Once the template is correctly marked, transfer the guideline onto the vinyl tile itself, ensuring any pattern is correctly aligned. Cut the shape out using a sharp utility knife. This templating method minimizes mistakes and ensures a neat fit around all complex fittings.
Punching Neat Holes for Radiator Pipes how to install vinyl floor tiles with adhesive
Fitting tiles around small, circular fixtures like radiator pipes during how to install vinyl floor tiles with adhesive demands a specialized technique to ensure the hole is neat. A highly effective DIY method involves creating a homemade punch using a 150mm off-cut of copper pipe. Ensuring it is the same diameter as the heating pipe. Sharpen the inside edge of one end of the copper pipe using a round metalworking file.
Mark the location of the pipe precisely on the vinyl tile by drawing lines corresponding to the pipe’s width and distance from the wall. Rest the tile on a sturdy block of wood, position the sharpened copper pipe where the lines intersect. And strike the other end of the pipe with a hammer to punch a clean, circular hole through the tile. Cut a straight slit from the hole to the edge, dry-check the fit, and then adhere the tile firmly in place.
Finalizing the Floor: Rolling, Cleaning, and Curing Time
Upon completing the main installation, the finishing steps solidify the success of how to install vinyl floor tiles with adhesive. If non-adhesive tiles were used, roll a small roller over the entire surface. Paying focused attention to the corners and edges to ensure optimal adhesion to the subfloor. Immediately wipe away any adhesive that has squeezed through the joints using a damp cloth or sponge. If the adhesive has started to set, white spirit can be used sparingly to remove the residue. The waiting period before using the floor depends on the adhesive type. Self-adhesive tiles can typically be walked on immediately, although a few hours of settling time is often recommended. For glue-down tiles. Always consult the manufacturer’s specific recommendations for curing times, as these vary based on the subfloor and adhesive.
Perimeter Considerations: Do Vinyl Tiles Need an Expansion Gap?
When addressing how to install vinyl floor tiles with adhesive, the need for an expansion gap differs significantly from rigid click-lock planks. Standard, softer vinyl tiles typically do not require a large expansion gap. However, you must avoid forcing a tile tightly against any edge, such as the skirting or walls. Installing tiles too tightly restricts movement and can cause the edges to lift slightly as the material naturally reacts to ambient temperature changes. It is best practice to leave a small 1–2 mm gap around the perimeter. You can then expertly conceal and seal this small space using quality caulk or silicone to create a clean finished appearance while accommodating minor movement.
Safety Protocols and Final Cleanup for Your New Floor how to install vinyl floor tiles with adhesive
Safety is paramount, particularly when addressing how to install vinyl floor tiles with adhesive using specific products. If using solvent- or spirit-based liquid adhesives, be acutely aware that these products are highly flammable. Their fumes can also soak into clothing. Consequently, ensure all potential fire sources. Including pilot lights are extinguished in the room while the floor is being laid. Maintaining strong ventilation is also essential, so open all windows. Some manufacturers recommend wearing gloves when applying floor-tile adhesive, so always check the guidelines on the packaging. After installation, sweep or vacuum all debris. Use white spirit and a clean cloth to carefully remove any small remnants of glue or dirt from the tile edges.
Conclusion
Mastering how to install vinyl floor tiles with adhesive is an entirely manageable DIY endeavor that yields durable, appealing results and significant cost savings. Success is guaranteed by prioritizing meticulous subfloor preparation—ensuring the surface is clean, level, and dry. By utilizing key techniques such as dry-laying from the room’s center to ensure symmetry. Precisely calculating edge cuts, and carefully templating around complex obstacles like pipes and pedestals. You can achieve a flawless, professional finish. Adhere to safety warnings regarding adhesives and respect the manufacturer’s curing times before applying weight. Embrace these steps to confidently transform your space and enjoy the long-lasting resilience of your new vinyl floor.

