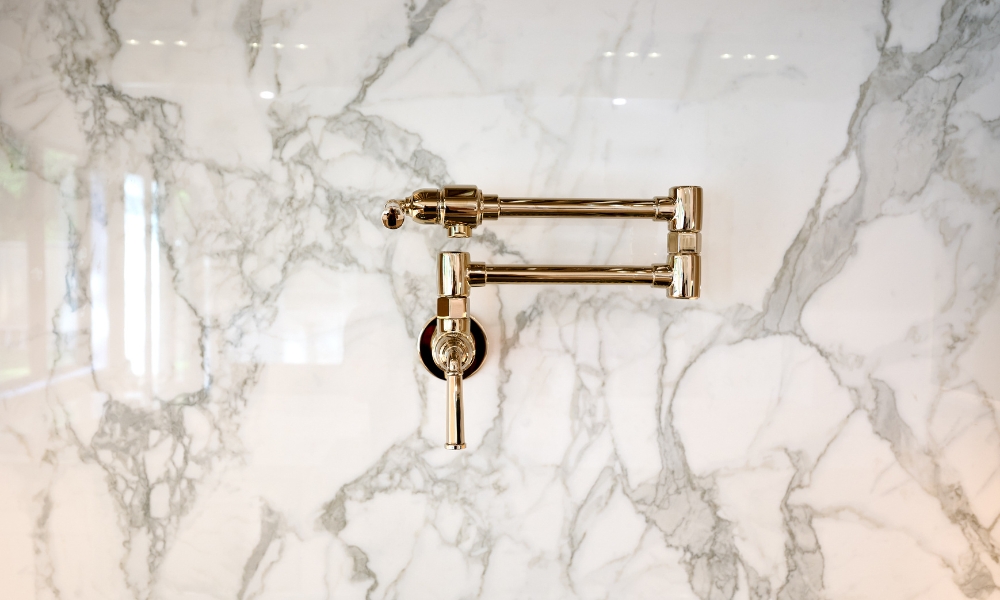
A pot filler faucet install is a practical addition to any kitchen, especially for those who frequently cook large meals. This specialized faucet is mounted on the wall above the stove, allowing you to fill pots with water directly on the cooktop, eliminating the need to carry heavy pots from the sink. In this comprehensive guide, we’ll walk you through the process of installing a It in your kitchen.
Why Install a Pot Filler Faucet?
Before diving into the installation process, let’s briefly explore the benefits of adding a pot filler tube to your kitchen:
- Convenience: It saves you from the hassle of lugging heavy, water-filled pots from the sink to the stove.
- Efficiency: It allows you to fill pots directly on the cooktop, speeding up the cooking process.
- Aesthetics: A pot filler adds a touch of elegance and functionality to your kitchen, often becoming a focal point in the design.
- Safety: Reduces the risk of spills and injuries by eliminating the need to transport heavy pots.
Materials and Tools Needed
Before you begin, gather the following materials and tools:
- Pot filler faucets
- Pipe wrench
- Adjustable wrench
- Drill and appropriate bits
- Pipe thread sealant or plumber’s tape
- Level
- Measuring tape
- Pencil or marker
- Wall anchors (if necessary)
- Safety goggles and gloves
Step-By-Step Guide
Step 1: Choose The Location
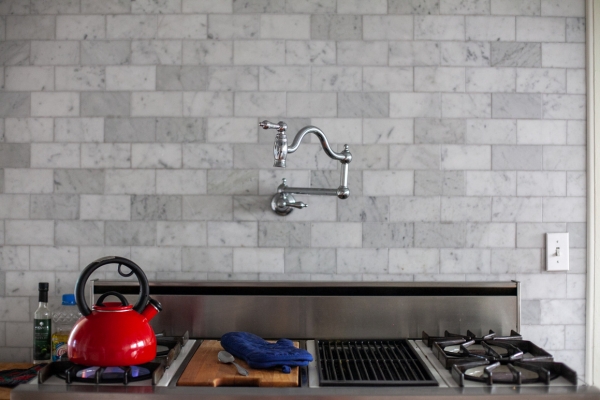
The first step in installing a pot filler tube is to choose the optimal location. This faucet should be installed above the stove or cooktop, where it can easily reach all burners. Consider the following factors:
- Height: Typically, the pot filler should be installed about 12-18 inches above the highest burner.
- Reach: Ensure that the Clean A Beer Tap Faucet arm is long enough to reach all burners on your cooktop.
- Wall Studs: Use a stud finder to locate wall studs for secure installation. If studs are not in the ideal location, wall anchors may be necessary.
Step 2: Shut Off The Water Supply

Before you begin any plumbing work, it’s crucial to turn off the water supply to the kitchen. Locate the shut-off valve under the sink or in the basement and turn it off to prevent any water flow during installation.
Step 3: Mark The Mounting Location
Using your measuring tape, level, and pencil, mark the exact location where you want to install the pot tube. Double-check the measurements to ensure that the faucet will be at a comfortable height and within reach of the burners.
Step 4: Drill Holes For The Mounting Bracket
Once you’ve marked the location, drill pilot holes for the mounting bracket. If you’re drilling into a stud, you can use wood screws to secure the bracket. If not, use wall anchors to provide additional support.
Step 5: Attach The Mounting Bracket
Secure the mounting bracket to the wall using the screws or wall anchors. Ensure that the bracket is level before tightening the screws completely. The bracket should be firmly attached to support the weight of It.
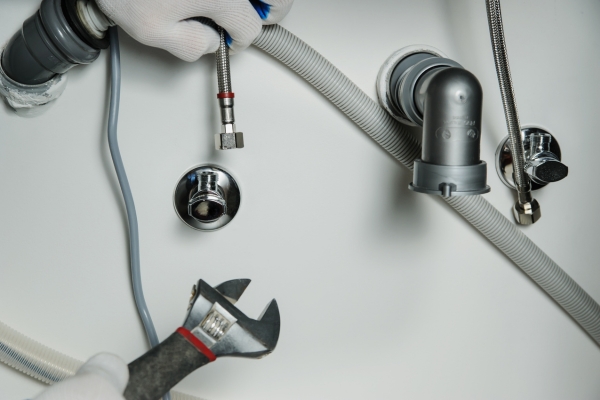
Step 6: Install The Water Supply Line
The first crucial task in installing your pot filler faucet is setting up the water supply line. This step involves running a dedicated water line from your kitchen’s water source to the location above your stove where the faucet will be mounted. If you don’t have an existing water line near the installation point, you’ll need to cut into walls or floors to route a new pipe. After measuring and cutting the appropriate length of pipe, attach it securely to the faucet’s inlet valve, using plumber’s tape or pipe thread sealant to prevent any leaks. Ensuring the water line is securely fastened and properly routed is essential to avoid future issues.
Step 7: Attach The Pot Filler Faucets
Once the water supply line is in place, the next step is to attach the pot tube itself. Start by positioning the faucet on the mounting bracket you previously installed on the wall. Ensure the faucet is aligned properly and can easily reach all burners on your cooktop when extended. Secure the faucet to the bracket with the provided screws, making sure it is level and tightly fastened. After securing the faucet, connect the water supply line to the faucet’s inlet, tightening the connection with an adjustable wrench to ensure a firm, leak-proof fit.
Step 8: Test The Faucet
After the faucet is securely attached, it’s time to test your installation. Begin by slowly turning on the water supply and inspecting all connections for leaks. Open and close the faucet multiple times to ensure smooth operation and proper water flow. Swing the faucet arm out and back to confirm that it moves freely and stays in place as expected. Allow the water to run for a few minutes to flush out any debris that may have entered the line during installation. This testing phase is vital to ensure that your pot tube is functioning correctly before finalizing the installation.
Step 9: Final Adjustments
The final step in the installation process involves making any necessary adjustments to ensure your pot tube operates perfectly. Check the faucet arm to see if it needs any adjustment in its swing or movement. If the arm feels too loose or stiff, refer to the manufacturer’s instructions to make the proper adjustments. Additionally, double-check all connections for security and re-tighten them if necessary to prevent leaks. Finally, clean the area and the faucet itself, removing any fingerprints or smudges, so your new pot tube looks as good as it works.
Maintenance Tips
To keep It in optimal condition, follow these maintenance tips:
- Regular Cleaning: Wipe down the faucets with a damp cloth regularly to prevent the buildup of grease and grime.
- Check for Leaks: Periodically inspect the connections for any signs of leaks and tighten as necessary.
- Avoid Excessive Force: When swinging the faucets arm, avoid using excessive force, as this could damage the mounting bracket.
Conclusion
Installing a pot filler faucet is a rewarding DIY project that enhances both the functionality and aesthetics of your kitchen. By following these steps, you can successfully install a pot tube and enjoy the convenience it offers in your culinary endeavors. Whether you’re a seasoned home chef or just love the idea of adding a touch of luxury to your kitchen, a pot tube is a worthwhile investment.

