Understanding how to install peel and stick vinyl flooring on concrete represents one of the most accessible and cost-effective ways to update your home. Self-stick vinyl tile, also known as self-adhesive vinyl floor tile, is an excellent flooring option because it is affordable Incredibly durable, and highly resistant to dents, scuffs, and stains. Since the adhesive is already applied to the back of the tile, the installation process is significantly simplified. Which is why homeowners favor this product. Concrete subfloors are common in basements, garages, and laundry rooms, and mastering the specific preparation steps for this porous surface ensures a lasting bond. Learning how to install peel and stick vinyl flooring on concrete empowers you to achieve a professional. Maintenance-free finish without the high cost of professional installation.
Why Choose Peel and Stick Vinyl Flooring on Concrete?
Peel and stick vinyl flooring on concrete is favored for its unique combination of aesthetic variety and practical resilience, making it a powerful DIY solution. These self-adhesive floor tiles come in a wide array of patterns. Thicknesses and colors, often replicating the look of stone or porcelain tile floors. Crucially, self-stick vinyl tiles are highly resistant to dents, stains, and scuffs. Ensuring their durability in high-traffic or high-moisture areas like kitchens and laundry rooms. Because the process is straightforward—once the layout is determined. It is simply a matter of peeling and sticking—the project is quick. Often doable in a single weekend. This ease of installation makes learning how to install peel and stick vinyl flooring on concrete appealing to beginners and experienced DIYers alike.
Essential Acclimation and Material Sourcing for Adhesive Vinyl Tiles
Accurate material estimation and precise product acclimation are vital preliminary steps when planning how to install peel and stick vinyl flooring on concrete. To determine the required amount of flooring. Measure the room’s length and width, then multiply these numbers to find the total area in square footage. If the room has an irregular shape, divide it into smaller sections, calculate each area, and sum the totals. Always purchase about 10% extra material to account for cutting waste and future replacements. It is also crucial that vinyl flooring be used in a temperature-controlled environment before, during, and after installation. Self-stick vinyl tiles must be stored flat in the installation location for 48 to 72 hours prior to laying. As failing to acclimate the products may result in adhesive failure and a compromised final product. Furthermore, ensure all tiles are from the same lot and batch to avoid visual inconsistencies.
Gathering Essential Tools for Peel and Stick Installation on Concrete
Before you begin the process of how to install peel and stick vinyl flooring on concrete, gathering the right tools is necessary for smooth execution. Basic laying tools include a utility knife, a tape measure, a chalk line, a pencil, and a carpenter’s or speed square. A 3-section roller is required after installation to ensure the tiles are set firmly. Since the subfloor is concrete, additional preparatory materials will be needed, such as latex floor primer. Chisels and concrete fillers to patch and smooth the surface. Safety equipment is also mandatory: always wear safety glasses when removing bumps with a chisel. Use knee pads for comfort, and wear a dust mask when cleaning the dusty concrete surface.
Subfloor Mastery: How to Prepare Concrete for Peel and Stick Vinyl Flooring
The most critical step in learning how to install peel and stick vinyl flooring on concrete is the meticulous preparation of the subfloor. The surface must be perfectly smooth, clean, dry, and entirely free from old adhesive, moisture, dust, grease, or wax. Concrete is particularly challenging because it is highly porous and tends to be dusty and dirty; any dirt, dust, or pebbles left behind will be felt and potentially seen through the vinyl tile over time. A simple sweeping is often insufficient; instead, you should give the floor a thorough vacuum with a hard-surface attachment to completely eliminate fine dust.
Sealing Porous Concrete for Lasting Adhesion
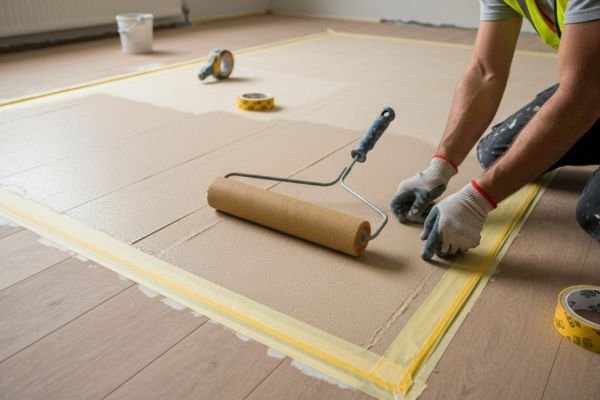
Since concrete is a porous substance that constantly absorbs moisture, a barrier is essential when learning how to install peel and stick vinyl flooring on concrete. Without this protection, the self-stick adhesive will not bond easily or for very long. You must apply a coat of a good latex floor primer to the concrete. The primer seals the surface and gives the vinyl tiles something effective to stick to. Extending the life of the tiles considerably. Ensure the primer is applied with a paint roller and allowed to dry completely before you begin the actual tile installation. Caution: Never add additional adhesive to self-stick flooring. As this can void the warranty and cause a chemical reaction that prevents the tile from sticking.
Fixing Imperfections: Leveling Your Concrete Subfloor
A successful project on how to install peel and stick vinyl flooring on concrete hinges on achieving a perfectly level surface. You must address any large holes, cracks, or dips, as these imperfections will be visible and felt through the vinyl tile. Use concrete patching compound and self-leveling compound to repair large holes or uneven areas. For minor, raised bumps on the concrete, these can sometimes be smoothed out using a coarse-grit abrasive or removed with a cold chisel and a small sledgehammer (remember safety glasses!). Use a level to check the subfloor; the surface must meet a flatness tolerance of no more than 1/16-inch over a six-foot length to ensure the tiles adhere properly and do not show blemishes over time.
Layout Strategy: Centering the Peel and Stick Pattern
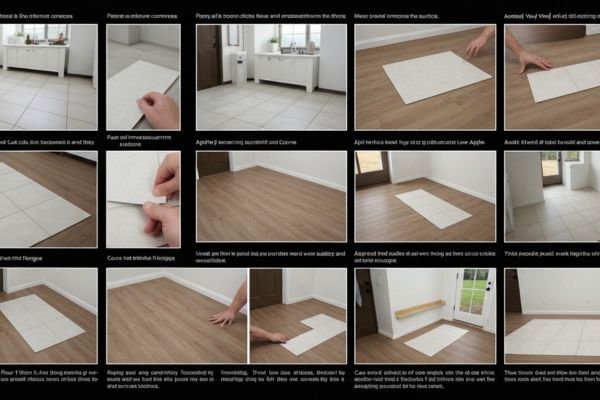
Strategic layout planning is crucial for ensuring a visually appealing and symmetrical result when learning how to install peel and stick vinyl flooring on concrete. The tiles should be centered, often starting at a prominent focal point like a doorway or a window. To establish the layout, measure to find the center of two opposite walls and use these points to snap a chalk line across the room. Then, snap a second chalk line perpendicular to the first, creating an intersection that marks the room’s exact center. Before removing any backing, trial-fit or dry-lay a row of tiles down both reference lines to visualize the pattern and determine if adjustments are needed.
Dry-Laying and Adjusting the Starting Lines for Peel and Stick Vinyl Flooring
The purpose of dry-laying is to optimize the final cuts around the perimeter. Which is a vital part of how to install peel and stick vinyl flooring on concrete. When trial-fitting the tiles (with the backing still on). Check the width of the remaining tile that will meet the walls. You must avoid small perimeter pieces. Especially those less than 6 inches (or in some cases, less than 2 inches) wide, as these tiny cuts are prone to peeling off easily. If the resulting edge piece is too small, adjust the original chalk reference lines as necessary. The goal is to shift the starting point so that the tiles will end up with at least half a tile’s width where the flooring meets the walls. Ensuring the final layout is visually balanced and structurally sound.
Laying the Self-Adhesive Tiles: Starting from the Center
Once the layout lines are adjusted, you can begin the physical process of how to install peel and stick vinyl flooring on concrete. Start laying the tiles from the exact center point where your two adjusted reference lines intersect. Peel the backing off the first tile and press it down firmly, aligning it precisely with the cross-hairs. Immediately install the next tile tightly against the edge of the initial tile. Work outward in a step pattern or one quadrant at a time toward the walls. As you work, apply strong pressure to every bit of the tile to ensure maximum adhesion. It is helpful to keep a trash bag nearby to dispose of the removed release papers cleanly. For added security on freshly laid tiles, you can temporarily place heavy objects. Such as hand weights or paint cans, onto them for a few minutes.
Mastering Straight Cuts on How to Install Peel and Stick Vinyl Flooring on Concrete
When completing the rows, the last tile will likely require a straight cut to fit the remaining space, a common step in how to install vinyl floor tiles with adhesive. The simplest method is the no-measure technique: place the tile you intend to cut (Tile A) directly on top of the last full tile laid, and then place a third full tile (Tile B) against the wall, overlapping Tile A. Use the edge of Tile B to mark a cutting line on the face of Tile A. Gently score the top of the tile along this line with a utility knife. The tile can then be snapped cleanly along the scored line. Once cut, make sure the cut side is always placed closest to the wall. When placing these edge pieces, maintain a small expansion gap of about 1/32-inch at the wall perimeter.
Templating Irregular Cuts and Tricky Corners how to install peel and stick vinyl flooring on concrete
Irregular cuts, such as those required around pipework, corners, or floor fixtures. Demand accurate templating to avoid material waste when learning how to install peel and stick vinyl flooring on concrete. Newspaper is an excellent material for templates because it is flexible, easy to cut, and readily available. Trace the shape of a whole tile onto the newspaper, then wedge the paper template into the awkward spot. Carefully tracing the outline of the obstacle with a pencil. Cut the shape out of the paper template and test the fit before transferring the design onto the vinyl tile. Cut the vinyl tile using a box cutter or Exacto knife. Always test the template and cut piece before removing the backing and sticking the perfectly shaped tile into place.
Finalizing the Floor: Rolling and Securing the Perimeter
The final stage of how to install peel and stick vinyl flooring on concrete involves firmly securing the bond between the tiles and the subfloor. You must use a floor roller, applying firm pressure, to roll back and forth across the finished tiles in both directions. This rolling action is essential to ensure every part of the tile is fully bonded to the concrete subfloor. If you need to kneel on the freshly laid floor to finish cutting perimeter pieces. Place a piece of plywood down; this distributes your weight and prevents individual tiles from slipping or displacing. After all tiles are set, clean the surface with a wet cloth to remove any potential adhesive residue. Finally, reinstall or secure the wall base and moldings to cover the perimeter gaps.
Post-Installation Care and Avoiding Common Pitfalls
Adhering to proper curing time is non-negotiable for the long-term success of how to install peel and stick vinyl flooring on concrete. After the installation is fully complete, you must wait 72 hours before placing heavy furniture or walking heavily on the new floor. Giving the adhesive ample time to set fully. It is further suggested to wait five days before washing the floor for the first time. A primary pitfall to avoid is insufficient subfloor preparation; any dirt, holes, or cracks will cause issues over time. Remember never to skip the 48-72 hour acclimation process, as improper temperature conditioning is a major cause of adhesive failure. By respecting these simple, durable tiles, your new flooring will be virtually maintenance-free.
Conclusion
Mastering how to install peel and stick vinyl flooring on concrete is an achievable. High-value DIY project that yields durable, professional-quality results. Success is anchored in meticulous subfloor preparation. Which requires cleaning Leveling and sealing the porous concrete surface with a latex primer. By utilizing the strategic center layout method, trial-fitting tiles to avoid small perimeter pieces, and employing easy templating techniques for irregular cuts, you can ensure a flawless installation. Always finalize the project by rolling the entire surface firmly and allowing the full 72-hour curing period. Embrace this straightforward, cost-effective method to transform your space with the lasting resilience and style of self-stick vinyl tile.

