If you’ve ever experienced A slow-draining sink or noticed water pooling around the drain, It might be time to adjust your bathroom sink stopper. The stopper is an essential component of your sink that controls the flow of water And prevents debris from clogging the pipes. However, Over time, The stopper may become misaligned or loose, causing drainage issues. In This Article, We will guide you through the step-by-step process of adjusting your bathroom sink stopper to restore proper functionality And ensure Efficient drainage. With just A few simple tools And some basic knowledge, You’ll be able to tackle this task without needing to call A plumber. So let’s dive in And learn how to adjust your bathroom sink stopper like A pro!
Importance Of A Properly Functioning Bathroom Sink Stopper

A bathroom basin is A seemingly insignificant component of your bathroom setup but plays A vital role in Its functionality. This mechanism controls the water flow in your basin, allowing you to fill or drain your basin as needed. An improperly functioning basin can lead to inconveniences, such as water wastage, Drainage issues, and even potential basin overflows. Consequently, maintaining A properly functioning basin block is essential not only for the overall efficiency of your basin but also for water conservation And avoiding potential mishaps.
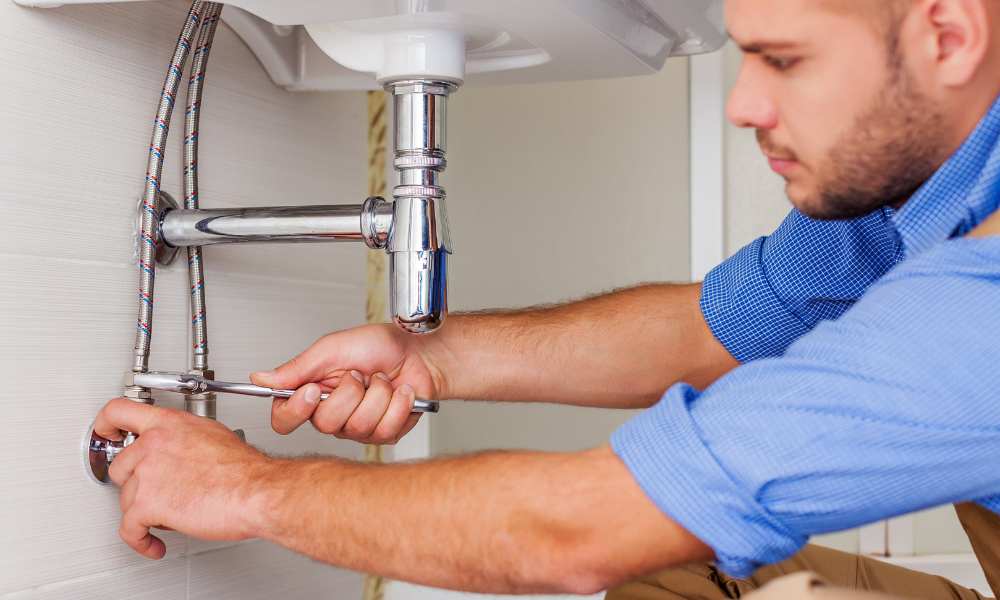
Clear The Sink And Access The Stopper Mechanism

To adjust your bathroom sink stopper, begin by clearing the sink of any items and cleaning out any dirt or debris. This helps prevent any accidental loss of small objects down the drain or hindrances while working. Next, access the cork mechanism. This typically involves opening the cabinet beneath the sink and locating the horizontal rod connected to the sink’s drainpipe. You’ll find a vertical strap, known as a clevis, attached to the horizontal rod with a pivot nut. Ensure you have a clear view and easy access to this setup.
Lose The Clevis Screw

The next step in adjusting your bathroom basin is loosening the clevis screw. The clevis is attached to the horizontal rod by a small spring clip, also known as a clevis screw. Carefully unfasten this screw. Be sure to hold the components firmly to prevent them from detaching and slipping into the drain pipe. Remember, a small container can be handy to hold these small parts and keep them from getting lost.
Adjust The Position Of The Clevis And Horizontal Rod
With the clevis screw loosened you can now adjust the position of the clevis and horizontal rod. Slide the clevis up or down the horizontal rod to achieve the desired position. Once adjusted, fasten the clevis screw to secure the new position. Check the operation of the pin by lifting and lowering the sink’s lever. If the basin opens and closes as desired, you’ve successfully adjusted it. If not, repeat the process until the block operates to your satisfaction. Remember to proceed with patience, As fine-tuning these Adjustments can take A few tries.
Remove The Stopper Assembly From The Drain

To adjust your bathroom sink stopper, You may need to remove the stopper assembly from the drain. This allows for A more thorough inspection And more significant adjustments. Typically, you can remove the stopper by twisting and lifting It out of the drain. If It’s connected to A pivot rod, You may need to disconnect this first. Be careful not to drop any small parts down the drain during this process. Remember, A slow And steady approach ensures that you don’t accidentally cause more issues.
Adjust The Linkage Or Adjust The Nut

Once you’ve removed the stopper assembly, you can adjust the linkage or the nut that controls the stopper’s position. The linkage is A series of rods that connect the pin to the lift rod, And you can adjust It by moving the clevis up or down. Alternatively, You can adjust the nut that holds the pin in place by loosening or tightening It to achieve the desired basin position. Either way, Make small adjustments And then test the stopper’s operation to ensure you’ve achieved the desired result.
Remove The Grid Cover Or Strainer

If your basin is still not functioning correctly, you may need to remove the grid cover or strainer. This is a larger component located at the drain’s entrance, and removing it can provide a clearer view of the pin mechanism. Unscrew and carefully lift the strainer or grid cover out of the drain. This step may require the use of pliers or A wrench, so be sure to have these tools on hand. Once removed, You can conduct A more thorough inspection or make more significant adjustments to your basin. After adjustments, always remember to replace the strainer or grid cover securely.
By following these steps, you can adjust your bathroom sink stopper and restore it to optimal functionality. However, if problems persist, consider seeking professional help to avoid damaging your sink’s drainage system.
Adjust The Height Or Position Of The Stopper

With the sink stopper assembly now removed from the Bathroom Sink drain, Your next step is to adjust the stopper’s height or position. This process requires careful manipulation of the stopper and its linkage. Adjust the clevis strap on the linkage to change the stopper’s height. This can be done by loosening the clevis screw and moving the strap up or down before tightening the screw again. You should aim to adjust the stopper so that when it’s down, it seals the basin drain completely, And when it’s up, It allows for the free flow of water.
Reassemble And Test The Adjusted Stopper

Once you’ve Adjusted the stopper to the desired position, It’s time to reassemble the pin mechanism. Carefully place the block back into the drain, Making sure It’s correctly Attached to the linkage And that the pivot rod is securely connected. Ensure all connections are tightened adequately to prevent leaks. After reassembly, Test the adjusted pin by operating the sink’s lever. It should move up And down smoothly, Allowing water to drain when It’s up And retaining water when It’s down. If It does not, You may need to repeat the process until the desired operation is achieved.
The Final Thought
Adjusting A bathroom sink stopper might seem like A daunting task, But with patience and careful attention to detail, It can be A straightforward DIY project. Remember, the goal is to ensure the pin functions optimally, allowing you to fill and drain your sink as needed. In case the adjustment process becomes too complicated or if the pin continues to malfunction even after adjustments, It might be best to consult with A professional plumber. They can diagnose And rectify the issue, ensuring your sink operates as It should, providing you with convenience and peace of mind.

