
Installing shower doors can be A rewarding DIY project that not only enhances The functionality And aesthetics of Your bathroom but also potentially increases your home’s value. This guide will walk You through the essentials of how To install shower doors, ensuring You have a clear understanding of The tools, materials, And steps involved. Whether You’re installing sliding or hinged doors, this article provides easy-To-follow instructions, practical tips, And Safety advice To ensure a successful installation. Perfect For homeowners looking To upgrade their bathroom, this guide promises to deliver user-friendly instructions For A seamless shower door installation process.
How Do I Know If My Shower Door Is Properly Installed?

Ensuring that your shower door Is properly installed Is crucial For both safety and functionality. A correctly installed shower door will open And close smoothly without any sticking or scraping. It should be perfectly level, And there should be no gaps between the door And the frame where water Can escape. Additionally, the seals And sweeps at the bottom of The door should effectively prevent water leakage. If your shower door wobbles, makes noise, or fails To close fully, these may be indicators of improper installation.
Can I Install A Shower Door On Any Type Of Shower?

It’s important to recognize that shower doors are not A one-size-fits-all solution. The ability to install A shower door depends on The type of pour You have. For instance, frameless pour doors require sturdy, solid walls for proper support, while framed doors can be more forgiving. The material of Your shower walls (tile, fiberglass, etc.) And the shape of your pour (straight-line or corner) also play A significant role in determining The suitable type of door. It’s essential To choose a door that aligns with The specifications and structure of Your existing shower.
Installing Process
1. Gather Your Tools And Materials

Before starting The installation process, gather all necessary tools and materials. This typically includes a tape Measure, Level, Drill, Drill Bits, Screws, Anchors, Silicone Sealant, And Of Course, The Shower Door kit itself. Having everything on hand before You begin will streamline The installation process And help avoid any interruptions.
2. Measure Carefully
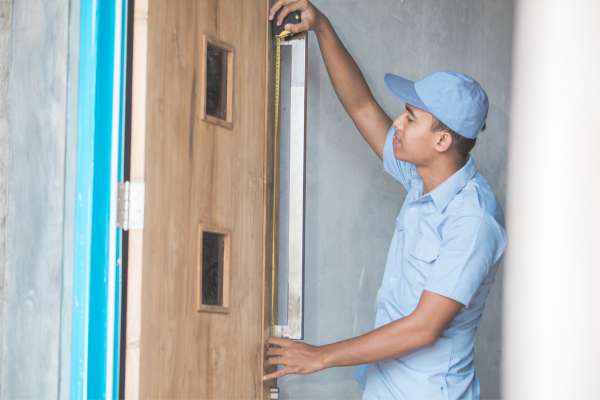
Accurate measurement Is key to A successful installation. Measure The width of Your shower opening at both The top and The bottom, As well as the height, To ensure the door will fit properly. Remember that walls Can be uneven, so multiple measurements might be necessary. If your measurements reveal significant differences, You may need A custom-sized door or additional adjustments To ensure a proper fit.
3. Unpack And Prepare The Doors

After gathering Your tools And taking precise measurements, The next step Is To unpack and prepare The shower doors. Carefully remove The doors from The packaging, being mindful of any fragile components like glass panels. Lay out All parts And cross-check with The installation guide To ensure everything is included. Before proceeding, clean The area where The door will be installed. This step Is crucial For a smooth installation, As any debris or dirt Can interfere with The proper fitting of the door.
4. Install The Track


The install of the track Is A Critical step In ensuring The stability And functionality of your shower doors. Begin by aligning The track with your earlier measurements And Markings. It’s essential to ensure that The track is level; even a slight angle Can cause significant issues with the door’s operation. Once positioned correctly, mark the drilling points using A pencil. Drill The necessary holes, And then secure the track using The provided screws. In some cases, silicone sealant may be applied under the track for additional water resistance And stability. After the track Is securely in place, double-check its alignment And level before moving on To the next step.
5. Hang The Doors

With the track securely install, the next step is to hang The shower doors. Begin by carefully lifting The first door and aligning its rollers or hooks with the track. Gently slide the door into place, ensuring it moves smoothly along The track. If your shower door design includes both stationary and sliding panels, make sure To install the stationary panel first according to The manufacturer’s instructions. After the first door is in place, repeat The process with the second door, If applicable. It’s crucial To adjust the doors so they align perfectly with each other and The walls to prevent any gaps or misalignment.
6. Attach Handles And Other Hardware
Once The doors are hanging and properly aligned, The next step Is to attach the handles And any additional hardware. This typically includes door handles, towel bars, or knobs. Start by identifying The correct placement For these items As per The Installation guide. Mark the points where The screws or bolts will go, ensuring they are evenly spaced and level. Drill pilot holes if required, then secure The hardware using screws or bolts. When attaching handles or towel bars, make sure they are tight enough to be functional but not So tight that they crack The glass. After all hardware Is attached, inspect the doors again To ensure they open And close smoothly And that all fittings are secure.
7. Seal With Caulk
Sealing the shower doors with caulk Is A critical step In Ensuring A watertight installation. Choose A high-quality silicone caulk that Is specifically designed For bathrooms And Is mold and mildew resistant. Start by applying A bead of caulk along the edges where The pour door track meets The shower walls and base. It’s important To be consistent and steady As You apply the caulk To ensure An even seal. Make sure to fill any gaps completely, but avoid applying too much caulk, which Can create a messy appearance. Use A caulking tool or your finger (dipped in soapy water) To smooth out the caulk line for A clean, professional finish.
8. Let It Set
After applying The caulk, it’s essential to allow sufficient time For it to dry And set properly. Refer to The caulk manufacturer’s instructions for the recommended drying time, which usually ranges from 24 to 48 hours. During this period, avoid using the shower To ensure the caulk isn’t disturbed As it sets. This waiting period Is crucial to ensure a strong, waterproof seal around your new pour doors. Once the caulk Is fully set, your new shower doors will be ready For use, providing A fresh And updated look To Your bathroom.
Are There Eco-Friendly Shower Door Options?

Yes, there are eco-friendly options available for those looking To Install shower doors with a lower environmental impact. These sustainable choices include doors made from recycled glass or responsibly sourced materials. Some manufacturers also focus on producing pour doors that feature energy-efficient properties, such As thermal insulation, reducing The amount of heat loss during showers And hence conserving energy. Additionally, eco-friendly pour doors often come with coatings that are designed To repel water And soap scum, reducing The Need for harsh cleaning chemicals. By opting For these environmentally conscious options, homeowners Can contribute to sustainability while enjoying a modern And Functional Bathroom.
Conclusion
Installing shower doors Can significantly upgrade The functionality and appearance of A bathroom. By following the step-by-step process outlined – from gathering tools, measuring, preparing And hanging the doors, To installing hardware And sealing with caulk – homeowners Can successfully undertake this project. It’s encouraging To know that eco-friendly options are available for those mindful of their environmental footprint. With The right tools, careful planning, And attention To detail, installing shower doors can be A rewarding DIY project, adding both aesthetic appeal And value to your home.

