
Remove bathtub shower caddies are A convenient addition to any bathroom, Providing A designated space for storing and organizing your shower essentials. However, there may come A time when you need to remove them, Either to replace them with A new caddy or to clean the bathtub thoroughly. While removing A bathtub shower caddy might seem like A daunting task, It can be easily accomplished with the right tools and techniques. In this Article, We will guide you through step-by-step instructions on how to remove these caddies without damaging your bathtub or surrounding tiles. Whether you are looking for A temporary removal or planning to install A different style of shower organizer, Read on to discover the best methods for removing bathtub shower caddies effectively and efficiently.
Inspect The Caddy And Identify Attachment Points

The first step in removing bathtub shower caddies involves careful inspection. Shower caddies serve a vital role in our daily hygiene routines by providing organized storage for our bath essentials. They are typically attached to the wall or hung from the shower head via a hook, depending on the design.
Before starting the removal process, identify how your caddy is attached. Does it rely on suction cups or adhesive strips, or is it hanging shower caddies from a hook? By understanding the attachment points, you set the groundwork for successful, damage-free removal. This initial step is crucial to avoid unnecessary damage to your walls or the caddy itself, especially if you plan on reusing it elsewhere.
Apply Pressure To Release The Suction
Shower caddies often use suction cups as A means of attachment. These cups create A vacuum seal against the wall, ensuring a secure hold. However, when it comes to removing the caddy, these suction cups can be quite stubborn. The best way to release the suction is by applying gentle pressure. Place your fingers on the edge of the suction cup And press inward, Breaking the seal. This might take A few attempts, Especially if the suction cups have been in place for A long time. But remember, Patience is key. Don’t use too much force to avoid damaging the wall or tiles.
Use A Fat Object To Pry The Suction Cup Away
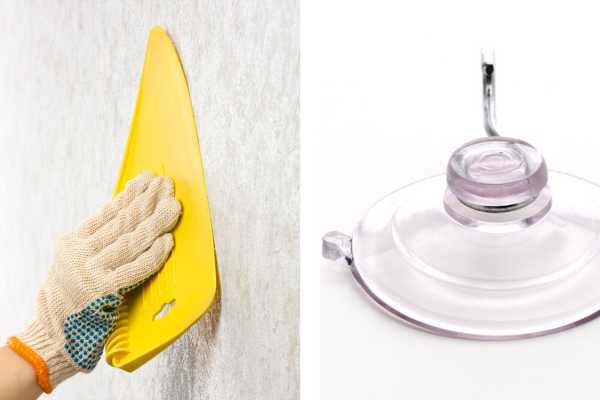
If direct pressure doesn’t work, You might need a little help from A tool. Using A flat, Non-abrasive object such as A plastic spatula or A credit card can be a handy method to pry the suction cup away. Insert the edge of the object underneath the lip of the suction cup and gently move it around the edges. This action should help break the seal and release the suction. Be cautious and patient during this process. Aggressive prying could potentially scratch or damage the wall, especially if you have tiles or a delicate surface. It’s all about finesse, not force. With the right technique, your caddy should be off the wall in no time.
Heat The Adhesive With A Hairdryer

In some cases, Your shower caddy may be attached with adhesive strips instead of, Or in addition to, suction cups. If This is the case, A different strategy is required. Adhesives form A strong bond with the surface, And brute force may damage your walls or the caddy itself. One of the most effective ways to loosen adhesive is to apply heat. A hairdryer is A perfect tool for this job. Point the nozzle towards the adhesive And turn it on A medium-to-high heat setting. Remember to maintain A safe distance to avoid any potential damage. This heat will help soften the adhesive, Making It easier to peel off in the next step.
Peel Off The Adhesive Strip Or Hook Gently

Once the adhesive has been heated and is soft, It’s time to peel It off. Start from one corner and slowly peel the strip off the wall. It’s essential to be gentle and patient during this step to prevent any leftover residue or potential damage to the wall. If the Adhesive does not come off entirely, Repeat the heating process until It is pliable enough to remove. This method should also work for hooks that are attached to the wall using adhesive. Take your time And ensure that all adhesive material is safely and effectively removed from your shower wall.
Cleaning Any Residue Left Behind
The final step in removing A bathtub shower caddy is cleaning any residual adhesive or marks left behind on your shower walls. Depending on the adhesive used, You might be left with some stubborn residue. A simple cleaning solution of warm water and dish soap can be effective for removing minor residues. For stubborn adhesive, you might need a specialized adhesive remover or rubbing alcohol. Apply the cleaning solution to the area And let It sit for a few minutes before scrubbing gently with A non-abrasive cloth or sponge. Rinse and repeat if necessary.
Removing A bathtub shower caddy can seem daunting, but with A step-by-step approach And A bit of patience, you can get it done effectively. Remember to always work gently to avoid any damage to your shower walls or the caddy itself.
Lose The Tension Rod By Twisting Or Turning It
In some bathrooms, The shower caddy might be attached to A tension rod. This is A rod that extends from the floor to the ceiling of the shower and holds the caddy in place. It functions by using the tension created when it is extended between two solid surfaces. To remove the caddy, you must first loosen the tension rod. This usually involves twisting or turning the rod, often in a counterclockwise direction. As you do this, you’ll feel the rod beginning to give, reducing the pressure against the floor and ceiling. Take care during this process as the rod may suddenly drop or slip once the tension is released.
Slid The Caddy Off The Tension Rod

After loosening the tension rod, it’s time to slide off the caddy. The process is typically straightforward and involves little more than lifting the caddy upwards and guiding it off the end of the rod. However, remember to handle it with care. You wouldn’t want to accidentally drop the caddy, causing potential damage or a loud ruckus. If the caddy seems stuck, don’t force it. This could mean it’s caught on something or simply jammed due to time and grime. A bit of jiggling should help free it. In some instances, you may need to apply a cleaning agent to loosen any stuck-on residue, allowing the caddy to slide off smoothly.
Clean The Bathtub Surface

Following the removal of your bathtub shower caddy, you might observe some areas that have remained untouched during regular cleanings. It’s imperative to clean these surfaces, eradicating any accumulated soap scum, grime, or possible mildew.
You can use commercial bathroom cleaners or create a DIY solution with common household items such as vinegar and baking soda. Using a non-abrasive scrubber or cloth, gently but thoroughly clean the area. Focus on any stubborn spots, making sure to remove all residue. After scrubbing, Rinse the surface with warm water. It’s essential to dry It off afterward using A clean towel to prevent water spots and further mineral buildup. By following these steps, you will not only remove the shower caddy but also refresh your bathtub surface, contributing to the overall cleanliness of your bathroom.
The Final Thought
Removing A bathtub shower caddy might seem like A small task, But it plays A significant role in maintaining the cleanliness And aesthetics of your bathroom. Whether you’re replacing the caddy, Updating your bathroom’s look, or simply giving it A deep clean, every step in this process is important.
From inspecting the caddy, loosening the suction cups or adhesives, sliding it off the tension rod, to cleaning the bathtub surface, each step should be carried out with patience and care to prevent any damage. Remember, the goal isn’t just removal, but also ensuring a clean, damage-free surface upon completion. Embrace the process as an opportunity to freshen up your bathroom space. A clean, decluttered shower area contributes significantly to a more relaxing and pleasing bath experience. Enjoy the freshness and openness your newly decluttered bathtub will bring!

