Wooden chairs can be classic and timeless, but they might not always provide the comfort or aesthetic appeal you desire. Transforming a wood chairs into an upholstered one is an excellent way to breathe new life into your furniture. Whether you’re aiming for a more modern look or a plush feel, this project is straightforward and rewarding. In this guide, we’ll walk you through the process step-by-step, ensuring your DIY project is a success.
Tools And Materials You Will Need
Before you begin, gather the necessary tools and materials to make the process smooth and efficient:
Tools:
- Staple gun
- Scissors
- Screwdriver or drill
- Measuring tape
- Utility knife
- Hammer
- Pliers
Materials:
- Foam padding (2-3 inches thick, depending on your comfort preference)
- Upholstery fabric (enough to cover the seat and backrest with some extra for securing)
- Batting (optional, for a smoother finish)
- Spray adhesive
- Sandpaper (if painting or refinishing the chair)
- Primer and paint or wood stain (optional)
- Upholstery tacks or decorative nails (optional)
Step-By-Step Guide
1. Prepare The Wooden Chair
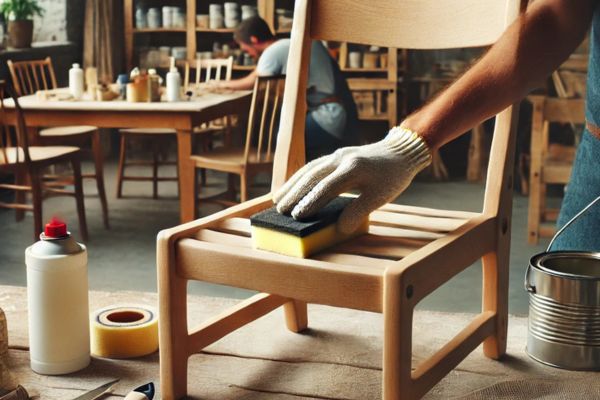
Begin by thoroughly inspecting your wooden chair for damages such as loose joints or cracks, and make necessary repairs to ensure the chair is sturdy. Clean the surface using a damp cloth to remove dirt, grease, or debris that could interfere with the transformation. If you plan to paint or stain the Make Wood Chairs, sand it down to remove the existing finish and create a smooth surface for better adhesion. Apply a coat of primer if needed, followed by your chosen paint or wood stain for a fresh look. Let the paint or stain dry completely before moving on to the upholstery process.
2. Remove The Seat And Backrest
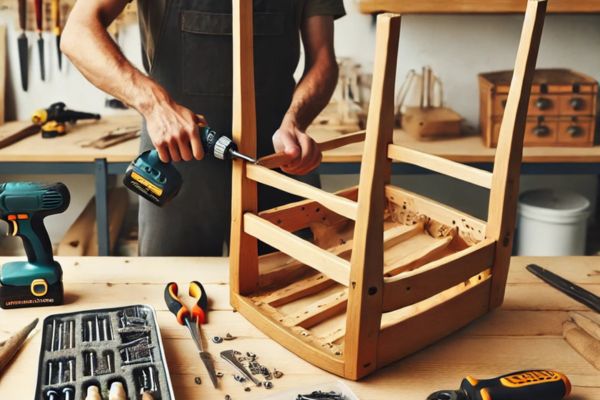
Begin by flipping the chair over and carefully unscrewing the seat from the frame using a screwdriver or drill. Place the screws and hardware in a safe spot to ensure you have them for reassembly later. If your chair’s backrest is detachable, repeat the process to remove it, taking care not to damage the frame. For fixed backrests, you’ll need to upholster directly onto the chair, which may require extra precision and creativity to ensure a clean and professional look.
3. Cut The Foam Padding
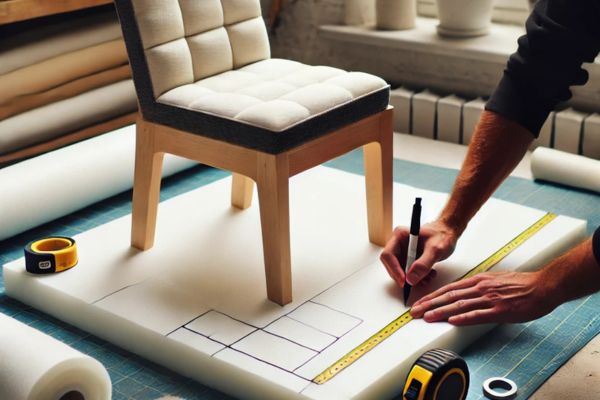
Start by measuring the dimensions of the seat and backrest using a measuring tape to ensure an accurate fit for the foam padding. Place the foam on a flat surface and position the seat or backrest on top. Trace the outline with a marker, making sure to follow the exact shape for a snug fit. Using a sharp utility knife, carefully cut the foam along the traced lines, keeping the edges as smooth as possible to avoid uneven padding during the upholstery process.
4. Attach The Foam Padding
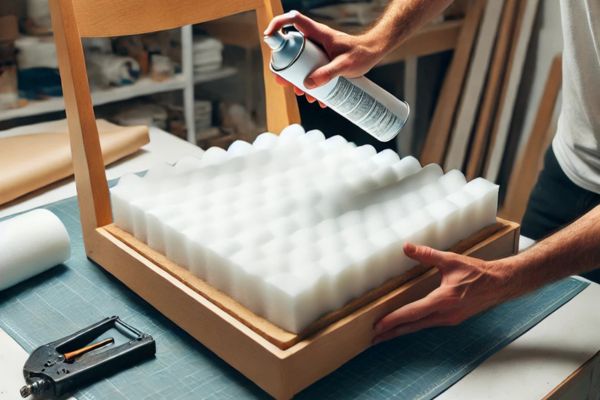
Begin by applying spray adhesive to the wooden surface of the seat or backrest to securely attach the foam padding. Press the foam onto the adhesive, ensuring it is properly aligned and firmly adhered. For a smoother and more polished finish, consider adding a layer of batting over the foam. Wrap the batting around the edges of the foam, pulling it taut to eliminate wrinkles. Secure the batting to the underside of the seat or backrest using a staple gun, keeping the staples evenly spaced for a neat appearance.
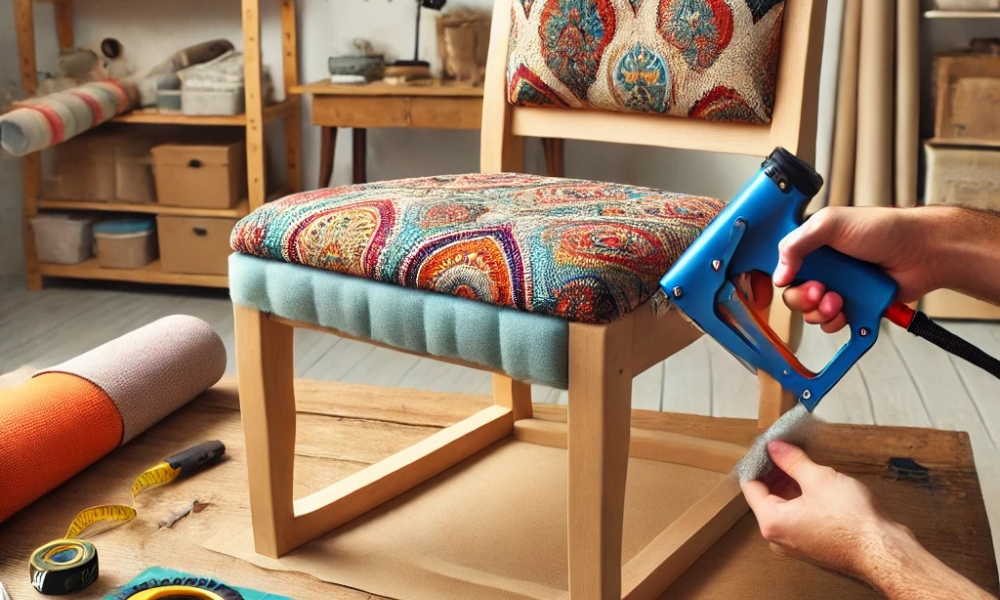
5. Cut And Attach The Upholstery Fabric
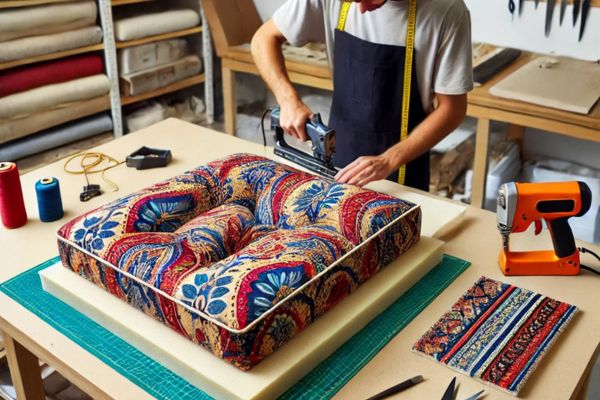
Lay your upholstery fabric on a flat surface with the patterned side facing down, and place the seat or backrest foam-side down on top. Cut the fabric, leaving 3-4 inches of excess around all sides to allow for wrapping and securing. Begin stapling by pulling the fabric tight and attaching it to the underside of the seat or backrest. Start at the center of each side, working outward toward the corners to ensure even tension. For the corners, neatly fold the fabric to create smooth pleats and secure them with additional staples. Finally, use scissors to trim any excess fabric, ensuring a clean edge that won’t interfere with the reassembly process.
6. Reassemble The Chair
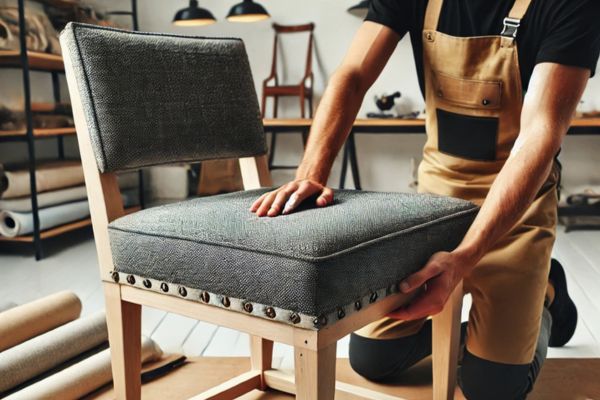
To Reassemble The Chair, position the newly upholstered seat and backrest onto the chair frame, aligning them with the original screw holes. Use a screwdriver or drill to securely fasten them in place, ensuring the screws are tightened evenly. Once reattached, check the stability of the chair by giving it a gentle shake and sitting on it to ensure everything is firmly secured. Make any necessary adjustments to guarantee the chair is both sturdy and comfortable.
Tips For Success
- Choose Durable Fabric: Opt for upholstery-grade fabric that can withstand regular use.
- Use a Coordinated Color Scheme: Consider the room’s decor when selecting fabric and paint colors for a cohesive look.
- Test Your Foam Thickness: Sit on the foam before securing it to ensure it’s comfortable.
- Add Decorative Touches: Upholstery tacks or nailhead trim can add a stylish, finished look.
- Practice Patience: Take your time with each step to avoid mistakes and ensure a professional finish.
Frequently Asked Questions (FAQ)
1. Can I Upholster A Chair Without Removing The Seat Or Backrest?
Yes, you can upholster a chair without removing the seat or backrest by working directly on the chair frame. However, it may be more challenging to achieve a smooth, professional finish, as the fabric must be neatly wrapped and secured while navigating around fixed parts of the chair. Taking extra care with folding and stapling can help ensure a polished look.
2. How Do I Clean Upholstered Chairs?
To clean upholstered chairs, use a vacuum with an upholstery attachment to remove dust, dirt, and debris regularly. For stains, spot clean using a mild fabric cleaner or a solution of warm water and gentle detergent. Test the cleaner on a small, inconspicuous area first to ensure it won’t damage the fabric. Blot stains gently with a clean cloth—avoid rubbing, as this can spread the stain. Allow the fabric to air dry completely after cleaning.
3. What If My Chair Doesn’t Have A Detachable Backrest?
If your chair doesn’t have a detachable backrest, you can upholster it directly by attaching the foam and fabric to the backrest with a staple gun. Start by securing the foam to the backrest using spray adhesive, then wrap the fabric over the foam, pulling it tight to avoid wrinkles. Carefully staple the fabric to the back of the chair, making neat folds and smooth edges for a polished finish.
4. Can I Use This Method For Outdoor Chairs?
Yes, you can use this method for outdoor chairs, but it’s essential to choose materials designed for outdoor use. Opt for weather-resistant fabric and foam that can withstand moisture, UV rays, and temperature changes. Additionally, consider using rust-resistant staples and spray adhesive specifically made for outdoor applications to ensure durability.
5. How Long Does This Project Take?
On average, this project takes about 2-3 hours to complete. The exact time may vary depending on the complexity of the chair design, the number of parts to upholster, and your level of experience with DIY projects. Beginners may take slightly longer, especially when focusing on achieving a neat, professional finish.
Conclusion
Transforming a wooden chair into an upholstered masterpiece is a fun and rewarding DIY project. With the right materials, tools, and a bit of patience, you can create a comfortable and stylish chair that suits your space perfectly. Not only will you save money compared to buying new furniture, but you’ll also have the satisfaction of a project well done. So, roll up your sleeves, get creative, and give your wooden chairs a plush makeover!

