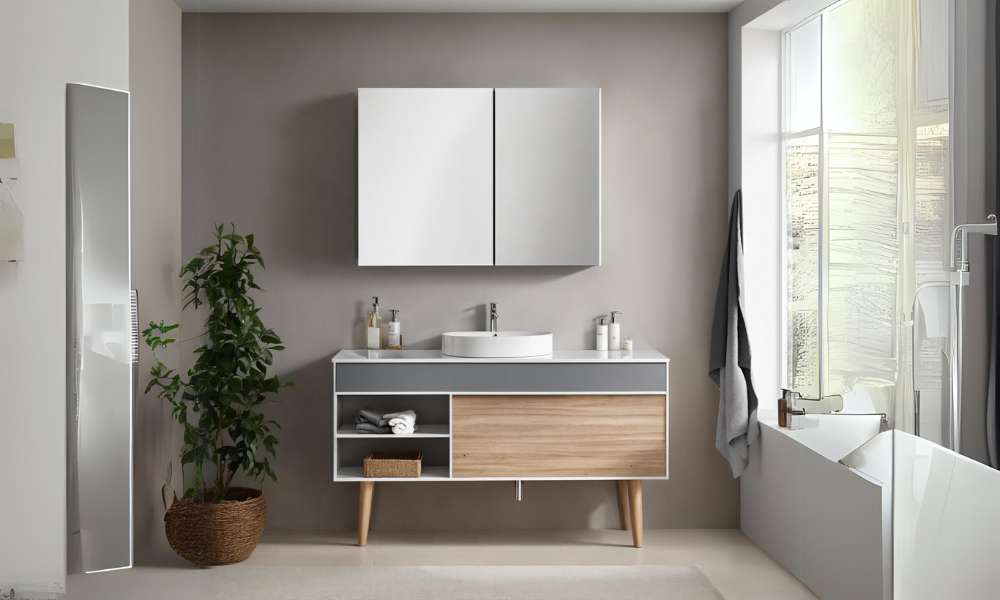
Fitting a vanity unit in your bathroom can transform the space, adding both style and functionality. Learning how to fit a vanity unit is an essential skill for homeowners looking to upgrade their bathrooms without hiring expensive professionals. This task, while seemingly complex, can be straightforward with the right tools and guidance. The benefits of installing a conceit unit yourself include cost savings, personalized customization, and a sense of accomplishment. It’s important to ensure that your new conceit entity is fitted correctly to avoid any plumbing issues or aesthetic misalignments. By following a detailed guide, you can confidently take on this project and enhance your bathroom’s appearance and utility.
How Long Does It Take To Install A Unit?
The time it takes to install a unit can vary depending on the complexity of the entity and the experience level of the person installing it. On average, a simple conceit entity installation can take anywhere from 1-3 hours. This includes tasks such as assembling the entity, securing it to the wall, connecting plumbing fixtures, and ensuring proper alignment.
How Often Should I Clean My Vanity Unit?
It is recommended to clean your vanity unit at least once a week to maintain its cleanliness and prevent the build-up of dirt and grime. Regular cleaning can help prolong the life of your conceit unit and keep it looking new for longer. You can use a mild soap or detergent and water to wipe down the surfaces of the entity, including the sink, countertop, and drawers.
Can I Customize My Vanity Unit?
Yes, you can definitely customize your vanity unit to suit your personal style and preferences. There are various options available for customization such as choosing the size, shape, color, material, and design of the conceit entity. You can also add features like extra storage compartments, built-in lighting, or a specific countertop material to make it more functional and aesthetically pleasing.
Shutting Off The Water Supply
Before you begin the process of fitting a conceit unit, it’s crucial to shut off the water supply to prevent any leaks or flooding. Locate the shut-off valves under the sink or, if necessary, turn off the main water supply to the house. This step ensures that you can safely disconnect the existing plumbing without any water damage. Properly shutting off the water supply is a vital initial step in learning how to fit a vanity entity, as it sets the stage for a smooth and controlled installation process.
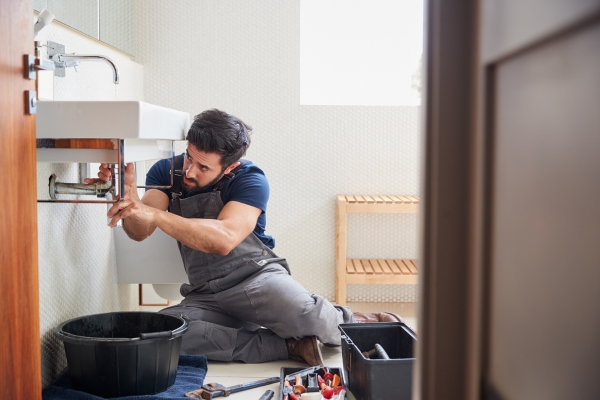
Disconnecting Plumbing
Once the water supply is shut off, the next step in fit a vanity unit is to disconnect the plumbing. Begin by removing the faucet connections, ensuring you have a bucket or towels handy to catch any residual water. Carefully detach the drain pipe and any other plumbing connections linked to the old vanity. This process requires some basic tools like a wrench and pliers. Properly disconnecting the plumbing is essential for successfully removing the old entity and preparing the area for the new vanity. By following these steps, you’ll be better equipped to fit your new conceit unit without complications.
Removing The Old Vanity Unit
With the plumbing disconnected, you can now focus on removing the old conceit unit. Start by loosening and removing any screws or brackets securing the vanity to the wall. If your vanity is caulked to the wall or floor, gently score the caulk with a utility knife to avoid damaging the surfaces. Once the vanity is free, carefully lift it out of place and dispose of it according to your local waste disposal regulations. Removing the old conceit entity clears the way for installing the new one and ensures a clean, prepared space for your new unit to be fitted seamlessly.
Ensuring Level Positioning
Ensuring level positioning is crucial when you fit a vanity unit to avoid future problems and ensure the unit’s functionality. Begin by using a spirit level to check the floor where the vanity entity will be installed. If the floor isn’t level, you might need to adjust the conceited legs or use shims to achieve a stable, level base. Mark the wall where the entity will be mounted, ensuring it aligns perfectly with your plumbing and aesthetic design. This step not only enhances the appearance but also prevents water from pooling in unwanted areas, ensuring your vanity entity remains durable and reliable.
Securing The Vanity Entity

1. Attaching To The Wall
Fitting a vanity unit involves several crucial steps to ensure it is secure and stable. One of the most important steps is attaching the entity to the wall. Begin by positioning the entity against the wall where you want it installed. Use a level to ensure it is perfectly aligned. Mark the positions where the screws will go, typically through the back of the conceit into the wall studs. Pre-drill holes in these marked spots to make the installation easier and more secure. Once the holes are ready, use sturdy screws to attach the conceit entity to the wall. This step is essential to prevent the entity from shifting or falling, ensuring that it remains securely in place for daily use.
2. Checking Stability
After attaching the conceit unit to the wall, the next step is checking stability. Even with the entity firmly screwed in, it’s vital to test its stability. Apply gentle pressure to various parts of the vanity to see if there is any movement or wobbling. If you notice any instability, it might indicate that additional screws are needed, or that the entity needs to be adjusted to sit flush against the wall. Ensuring the entity is stable not only enhances safety but also prolongs the unit’s lifespan by preventing undue stress on the fixtures and fittings. By following these steps, you can confidently fit a vanity entity that is both secure and stable, adding a functional and stylish element to your bathroom.
Reconnecting Water Supply Lines

Reconnecting water supply lines is a critical step when you fit a conceit unit, ensuring the entity is fully functional. Start by turning off the water supply to avoid any leaks or spills. Carefully attach the water lines to the faucet and ensure all connections are secure and watertight. Use plumber’s tape on the threads to prevent any leaks. Once everything is connected, slowly turn the water supply back on and check for any leaks. This step is essential as it ensures your new conceit entity operates smoothly and efficiently, providing a reliable water source for daily use.
Securing The Sink To The Vanity
To remove a vanity unit for maintenance or renovation purposes, there are several key steps to follow. First, turn off the water supply and disconnect all plumbing connections carefully. Then, locate and unscrew any mounting screws or brackets securing the conceit to the wall. Lastly, gently lift and pull out the vanity entity from its position, taking care not to damage any surrounding fixtures or walls. By following these steps diligently, you can safely remove a conceited entity without causing any unnecessary damage and ensuring a smooth transition for your bathroom project.
Cleaning The Vanity Unit
Maintaining cleanliness is essential once you know how to fit a vanity unit. Regular cleaning of the vanity entity helps preserve its appearance and functionality. Use a non-abrasive cleaner to wipe down the surfaces, avoiding harsh chemicals that could damage the finish. Pay attention to the areas around the sink and faucet, as they can accumulate soap scum and water spots. By keeping your entity clean, you ensure it remains a stylish and sanitary part of your bathroom for years to come. Proper cleaning also prevents the buildup of mold and mildew, which can cause long-term damage.
Preventing Water Damage
Preventing water damage is a critical consideration when you fit a conceited entity. Ensure that all plumbing connections are secure and free from leaks. Apply waterproof sealant around the edges of the vanity where it meets the wall and floor to create a barrier against moisture. Regularly check for signs of water damage, such as discoloration or swelling of the wood. Address any issues immediately to prevent further damage. By taking these precautions, you can protect your vanity entity and the surrounding area, ensuring a longer lifespan and maintaining the integrity of your bathroom’s design.
The Final Thought
Fit a vanity unit can be a rewarding and practical addition to your bathroom. By following the steps outlined in this article, you can ensure a successful installation process. Remember to measure carefully, choose the right entity for your space and style, and secure it properly to avoid any issues down the line. With attention to detail and patience, you can create a functional and stylish bathroom design that meets your needs. Take the time to plan and execute the installation correctly for long-lasting satisfaction with your new entity.

